I hope you've arrived here looking for a way to fix your Sharp MiniDisc player, because I've literally just done this with an "untested" Sharp MD-MS702 from eBay. It was listed at $39 USD and I offered $34.
So after wiping the smile off of my face for getting a nice clean MD-MS702, I powered it on only to be greeted by the dreaded "TOC ERRORa" when putting in a disc.
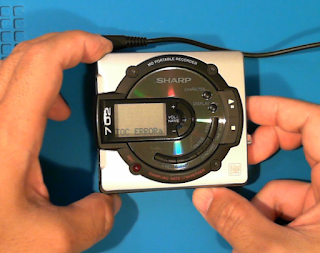
This was my first MD device in my twenties and I have so many good memories of spending hours recording music from CDs and tediously editing the track and disc names on the tiny screen.

If you've googled around, I'm sure you know this is a common failure and probably a fatal one for most people. It's a lot of work getting in there and moving around all the delicate components. Not to mention finding and installing a replacement worm gear!
Well, since I had been working on a lot of different Sharp models, I was prepared! I got my gear from Gerry Li and got down to it.
Taking the shells off was relatively easy, but once you're inside, you're going to want to be extra careful with the removal of the five ribbon cables. Getting to the gear itself and replacing it aren't that bad, but getting the ribbon cables threaded through so you can reassemble will be your final challenge.
It's definitely doable - this was my very first attempt at it and it took about 90 minutes.
Check out the video for the complete details. I've added chapter markers, but here are the most significant timestamps:
1:02 - TOC ERRORa
1:15 - Disassembly - bottom
2:45 - examining the ribbon cables
3:34 - Disassembly - top lid
4:07 - start removing ribbon cables
7:30 - removing the mechanism
8:18 - getting to the worm gear
11:34 - looking at the replacement gear
12:43 - Reassembly - making room to put the gear back in
20:02 - Reassembly - putting the mechanism back in
24:18 - Reassembly - screwing down the mechanism
24:39 - fixing the slot-in/eject
27:08 - Reassembly - putting the ribbon cables back in
30:18 - Reassembly - bottom
32:49 - Testing